How to Navigate the Explainer Video Production Process

You’ve probably heard that explainer videos can work wonders for your marketing strategy. But you may be left scratching your head over what the explainer video production process actually looks like. Well, this blog aims to be the bridge between knowing they’re great and actually producing one.
By explainer video, I mean any video that promotes your product or service through some kind of explanatory message. Yes, that’s quite broad. But whether you’re explaining how your app solves your audience’s problems or you’re explaining how your organization is superior to your competitors, everything in this blog will be applicable.
If you want to know more about the explainer video process read on. Whilst this is by no means your complete “literally-everything-you-need-to-know-explainer video guide,” it should give you all the information you need to start making one yourself and/or pay someone else to help you make it. It will show you how to make a good explainer video by outlining explainer video best practices and what a good explainer video structure looks like.
Before you start the explainer video production process, ask yourself, “how much do I want to spend?”
Your budget will be a big influencer when it comes to the kind of look you can achieve and the things you can include in your script. For the complete lowdown on explainer pricing, click here. But for a quick overview, take a look at the following.
- If you want top-quality animation like this, you’ll need to spend $13,000-$16,000
- $3,500 - $7,000 will get you something like this
- If you’re feeling a DIY explainer video you could film something yourself. This took $4,500 and a bit of creativity.
- And this was made for almost nothing
either
or
There will be all sorts of looks and feels between those price points. And of course, you could spend more – say multiple six figures and do something crazy like this.
By and large, you’ll get what you pay for. That said, if you need to keep costs down whilst maximizing quality at every step click here, to consider the following.
- Avoid animation: cheap animation always looks bad but low-cost live-action can still do your product justice. A screencast could also be an alternative to animation.
- Don't do 3D animation. It costs loads to make anything half decent looking.
- Keep your video short.
- Keep your video simple. Complex animation or intricate film sets cost money.
- Avoid character animation. It takes ages.
- Using stock imagery and templates. Just make sure you choose the right ones and maybe add a few elements of your own, otherwise, your video could look cheap and fake.
- See which assets can be reused. If you’re animating, consider using the same backdrops and designs across multiple scenes. If you’re doing live-action, using one location for different live-action setups can help.
- Animate with abstract graphics instead of figurative ones. Getting hands and landscapes right is usually much harder than animating circles and rectangles.
As you might be able to tell, there are several pros and cons to live-action videos vs animated videos. That’s a topic for a whole other blog post. But for now, just remember these key points.
- If your budget is only a few grand, it will probably go further on live-action.
- If you have a complicated or abstract product – i.e. many a tech product - then animation is usually a better choice.
- If you need to ensure your audience gets to know your business’s people and their personalities, live-action is the only way to go.
- Top-quality animation is usually going to be a lot more affordable than top-quality live-action.
O.K, now that you’ve got a budget in mind, consider if a freelancer or an agency will be better to work with.
I outline the pros and cons in another blog, but this list should give you a quick idea of what you can expect.
A freelancer will:
- Probably be cheaper.
- Probably have no other clients besides you during your time together.
- Be likely to produce more distinctive and individual work since it’s their personal style.
An agency will:
- Have a deeper, more diverse skillset than a single freelancer.
- Be better equipped to meet your deadlines.
- Offer a full service: script, V.O, etc.
- Usually have a shorter production time.
Both can deliver a quality final product and both can waste your time. It’s simply a case of being clear about your goals and making sure you only work with professionals.
Pre-Production
It can prevent your time and money from being wasted. It can help manage expectations and keep people to a deadline. It helps with spotting and reacting to challenges and problems. It makes resource allocation and getting more funding much easier and, in general, it makes the whole production process run a lot smoother.
“O.K, yes I geddit, pre-production is important!
But what does it actually involve?”
I’m glad you asked. The pre-production process typically looks a little like this.
Discovery
This phase can involve a few different things. It’s the process of gathering all the important details that will influence the direction your video will take. You may find that much of the discovery process happens naturally during your first few emails or conversations with your freelancer/production company.
Still, however obvious you think certain points may be, make sure you have a clear outline of what the project entails, in writing, before the rest of the pre-production process begins. Some things you might want to consider will include.
- What platform(s) will the video will live on? YouTube, website, social, etc.
- What would a successful video project look like? What are your goals?
- What, if any, core concept should the explainer video stick to? I.e. a narrative idea, use of certain visual elements, etc.
- Is there a particular tone of voice you’re keen on using?
- What style should the video have? This is particularly important if you’re doing animation. Reference videos will be your best friend here.
- What dos and don’ts should be adhered to?
- Is there a larger campaign that needs to be considered so that the video remains cohesive with it?
Mood board
This helps everyone to gain a quick idea of what the explainer video’s proposed visuals will be. If you’re doing live-action, then this stage may not be necessary. But with every animation project, it’s usually a wise idea. Mood boards can be created pretty quickly, pulling together whatever can be found on Google images, Pinterest, design blogs, etc.

Research and scripting
This is the blueprint for your entire video and determines pretty much every aspect of it. Length, what’s going to happen, what’s going to be said, what you’ll see, and more. If you’re animating, then getting this right will be particularly important since it’s so hard to change a script halfway through the animation/production process.
Whilst with live action you can certainly tweak and improvise on shoot day, having a solid script is still important; the clearer the idea you have of what you’re shooting, the easier shoot day will be.
The more research you can devote to your script the better. The better you know your target audience, your competition, and the product, the more engaging and powerful the final video will be. There’s a whole art to writing a decent script that’s best covered by another blog, but to give you a quick idea of what you should be doing here are a few tips.
-
- Ensure you hook your audience in the first few seconds. Your video is competing for attention with TikTok, Netflix, and everything going on in your audience’s busy life.
-
- This isn’t a must but it usually helps to start the video by addressing a problem your audience has.
-
- Tell them how your product will solve their problems/meet their needs.
-
- Focus on outcomes and benefits over specific product features. The one exception to this might be when your product has a particular feature that you know will be valued highly by your target audience.
-
- Incorporating some social proof like reviews or testimonials is usually pretty helpful.
-
- Always include a CTA. Every video should tell your audience what you want them to do next.
-
- Think visually. It can be tempting to focus on the words in the V.O but ultimately an explainer video is a visual art form.
-
- Your script should be like an F1 car: every element is performing a very important and specific function. If you don’t know why something is in a script delete it.
-
- Always read your script out loud. This can uncover plenty of errors or opportunities for optimizing things like the flow and wording.
-
- Keep the basics front of mind. Put your ideal customer, why your product is better than the competition, etc. at the core of everything you write.
If you’re writing a script for your own product, one last thing to consider is getting an outsider who’s unfamiliar with your product to look over your script. Very often people become far too close to their product to place themselves in their customer’s shoes. If this outsider is in your target audience, even better.
A quick word about length
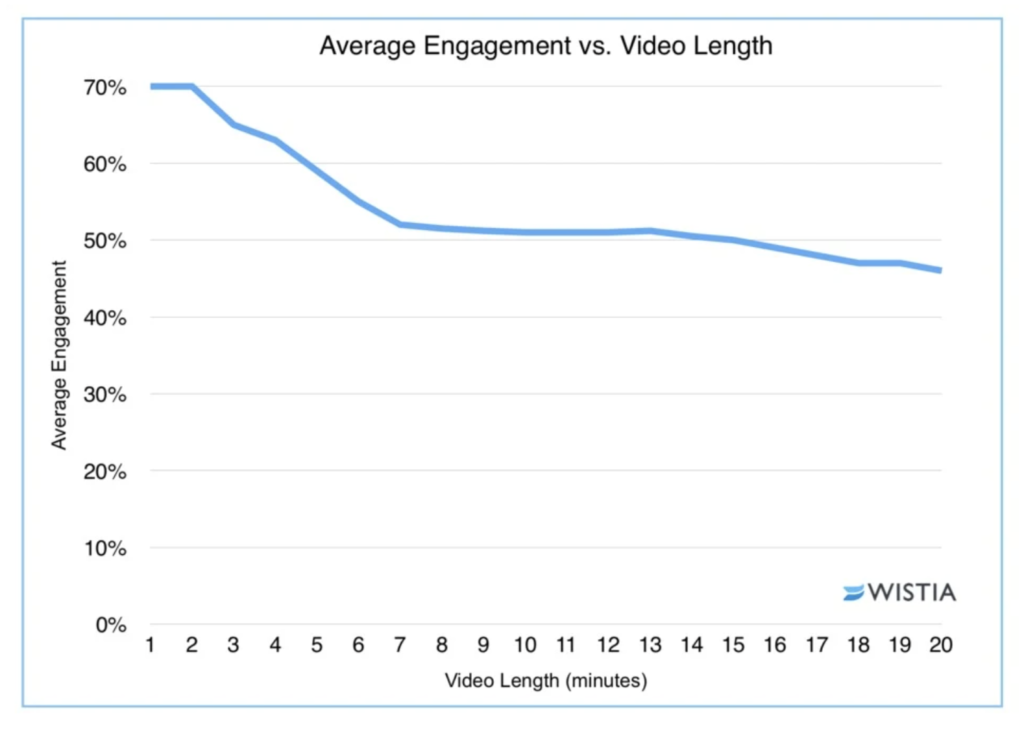
We’ve all heard that human attention spans are decreasing. And you may have also heard that the optimum length for an explainer video is 1-2 minutes. The data certainly backs this up. According to video hosting platform Vidyard…
| Most videos (60%) are under 2 minutes long | Only 24% finish a video if it’s over 20 minutes | Only 3% of business videos will be 10 to 20 minutes long |
The stats from b2b video hosting platform, Wistia also back this up.

It would seem that making a long explainer video should be avoided at all costs. However, I think this data can be a little misleading. Yes, if you want to play it safe, shorter is better. BUT, there are plenty of very effective explainer video examples that are beyond 2 minutes.
If you want to get to grips with the conundrum of explainer video length, then this blog should be helpful. For now, just remember that if you know that what you’re communicating to your audience is highly relevant and delivered engagingly, your video could well be more effective if you go beyond the two-minute mark.
Storyboarding
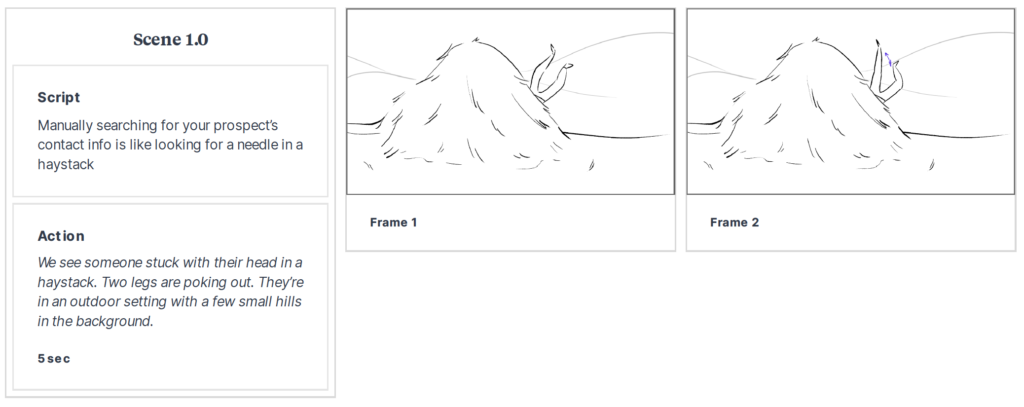
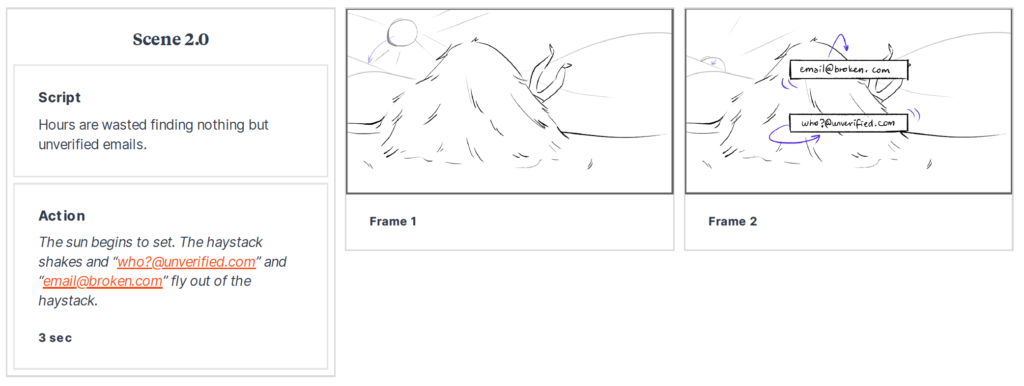
This will make your script easier to digest and make your entire video easier for your team to quickly grasp what your video contains. You may be able to get away with not having one if you’re doing a simple live-action shoot, but with animation, it’s a must. If only for the reason that it makes a designer/animator’s life much easier. Here are the first two frames of one that Bullseye Motion made for a client.


Style frames (if it’s animation)
To bring the storyboard to life, you’ll want to display a few select scenes in their full and final design. This will allow you and your team to give their views on the design without having to spend weeks designing the whole thing.


List of equipment, crew, and filming locations (if you’re making live-action)
With the script written and the storyboard in front of you, it’s time to think about how and where this video can be shot. The art of producing a live-action shoot is boundless and bottomless. So, slight confession, you’ll probably have to do a little more research beyond this blog if your explainer video is a particularly ambitious live-action project. There might be a risk assessment to do, a recce to plan with the director, set building to consider, etc., etc.
Live-action production really does vary from job to job and for that reason, you should always work with an experienced producer if you’re attempting anything beyond something very simple.
Production
I would say that this is where the magic happens. But nailing the explainer video production process is just as much pre-production as it is anything else. So the production phase is really the transferring of any magic you already have from paper to the screen.
If you’re animating your explainer video, then this stage will be left firmly in the hands of your design and animation team. Just make sure you’re available to give feedback whenever necessary. If you’re filming live-action and you’re shooting anything beyond something super simple then, as mentioned, make sure you work with an experienced producer and/or videographer. They’ll make sure your video looks good and your budget doesn’t get obliterated.
Every project is different but there are a few dos and don’ts that can improve the outcome of an explainer video.
- Do give clear, constructive feedback to your production team whenever you can. Unless decisions are improvised on set, ensure you put all feedback and creative direction in writing.
- If you’re animating, don’t do character animation unless you’ve got the time and money to make it good. Otherwise, you’ll just get something like this.
or
- Do use fonts that are as easy to read as possible. You should always aim to minimize effort from the audience.
- Don’t forget to leave space for subtitles. Plenty of people watch explainer videos on mobile with the sound off.
- Do call out key points of the messaging with text.
- If you’re animating, don’t use flat, cheap-looking design like this – unless you want to look cheap.
Post-production
This stage of the explainer video production process includes any creative work that comes after the core shooting/animation/design. This is typically editing (if it’s live-action), adding voice-over, and adding music/sound effects. As far as editing goes, this will very much be the job of an editor to go and get on with. Again, as with the production process, make sure you offer clear feedback at every turn. Regarding voiceovers and music…
A small point on voiceovers
You can pay $30 on Fiverr or you can pay an in-demand voice actor several thousand. I wouldn’t quite say you get what you pay for because I’ve found some quality V.O work for around the $50 mark. What I will say though, is don’t be afraid to spend whatever’s needed.
The V.O is a lot more important than you think and a bad V.O can ruin an otherwise great explainer video. Usually, an “expensive” V.O. will only cost maybe one or two hundred more than a cheap one. So unless you’re on a tight budget, opting for that extra bit of V.O quality should be worth it.
Music
Unless you can record your own or you are best pals with a record label executive, you’ll need to make sure you purchase royalty-free music. This is music you can use wherever and however you like for a one-time fee. We’ve got a full blog on getting the music right for your explainer video here. But if you just want a quick overview, read our dos and don’ts below.
-
Do make sure the music matches the message: e.g. don’t use a melancholic solo violin for a fun piece of sales software and don’t use light-hearted reggae for a will creation service.
-
Don’t’ use ukulele music like the example below. It’s corny, fake, and banal sounding (in my opinion). But more importantly, it’s everywhere. You want your video to stand out. So don’t make your video sound like everything else.
-
Do pick a genre of music your audience will like. E.g. if you’re promoting a financial tool to the over 60s, don’t have some crazy dubstep or intense techno.
-
Don’t distract from the messaging: make sure your music sits in the background and isn’t so loud or hectic that the viewer pays less attention to the visuals or the V.O. Here’s a great example of this.
-
However, do make sure the music is distinctive and memorable. An example of this being:
-
Don’t use too many sound effects.
-
And remember, you don’t need to have music from start to finish. Sometimes you might want to accentuate the V.O. by delivering it “a capella” or you may wish to demonstrate your app’s branded sound effects.
Here are my favorite places for buying royalty-free music.
-
Bensound; choose from 8 genres including Cinematic, Acoustic/Folk, Electronica, Corporate/Pop, Rock, Urban/Groove, Jazz, World/Others.
-
AudioJungle; large selection including music, audio logos/idents, sound effects, and more.
-
Storyblocks Audio; browse by mood or genre and download multiple tracks for as little as $10.80 per month.
-
Artlist; offering unlimited downloads, commercial use packages start at $16.99.
-
Partners in Rhyme; a range of different genres and sound effects + a small few that are 100% free of charge.
-
Magnatune; this site splits revenue with their artists 50/50.
-
PremiumBeat; a massive selection and it has a helper bot called M.A.X – music automated eXpert – that can help you find the right track for your project.
-
Jamendo; this site organizes tracks by the type of license you need.
-
Pond5; a massive media company offering music, After Effects templates, 3D models, and more.
-
Epidemic Sound: this site clearly states that anything published during the trial will be clear to use forever. Monthly subscriptions start at $26.
And here are some places you can download royalty-free music for free. In many cases, you’ll need to give credit to the artist so make sure you check the small print. Still, there’ll be plenty that are 100% free.
-
YouTube Audio Library: a wide mix of accreditation needed, and 100% free audio tracks.
-
Free Music Archive: you don’t even need to create an account for this one.
-
Facebook Sound Collection: great selection, however, it’s for use within Facebook only.
-
Free Ad Music: they grant “a one year, non-exclusive, gratuitous license for the World, for your authorized production only” and “the music must be used in a supporting or secondary role and not as the main content of the Authorized Production.”
-
Musopen; this site solely focuses on free classical/orchestral music.
-
Chosic; this site has several different tools that can help you find what you’re looking for.
Final thoughts
Hopefully, that should give you a clear idea of the explainer video production process and what explainer video best practices might look like. Even with a guide though, the explainer video process can present a host of challenges that you would rather not have to deal with.
If you’re looking to create an animated explainer video, Bullseye Motion is here to offer a 100% done-for-you service. From discovery to final draft, we craft every element required to do your product justice. If you would like to know more about how we achieve this, click the link below to book a meeting with me, Bullseye’s creative director.
P.S. all comments and feedback on this blog are appreciated! If there’s any way you think it could be improved, then feel free to shout and I’ll see if I can work them into a redraft. xx
